-
Notifications
You must be signed in to change notification settings - Fork 0
Admin
After logging in to arividam visit - http://www.arividam.in/admin/sites/site/ . Click on any of the existing sites to edit, or click the 'Add Site' button to create a new site.
Fields:
- 'Domain name' must be of the form: schoolname.arividam.in (without http or https before it)
- 'Display name' - The name of the school.
Under Site Configuration:
- Site css: Use a custom CSS file here to customise the look of the website. Click here to get more information on developing a custom CSS file.
- Banner logo: Upload an image file here to use instead of the arividam logo on the school masthead. The logo size is 125x40
- School type: Select the appropriate school type
- School code: The 5 digit school code (mandatory)
Calendar:
To add a Google calendar, click on 'Calendar settings' in the drop-down menu of the calendar in Google. Scroll down the page and find the 'Calendar Address'. The ID is of the format: xxxx@group.calendar.google.com or xxxx@gmail.com. The Calendar ID is shown highlighted in the image below.

Within Arividam admin, under 'GOOGLE CALENDARS' click on 'Add another Google calendar' and copy this ID to the 'Calendar id' field.
Click on 'Save'
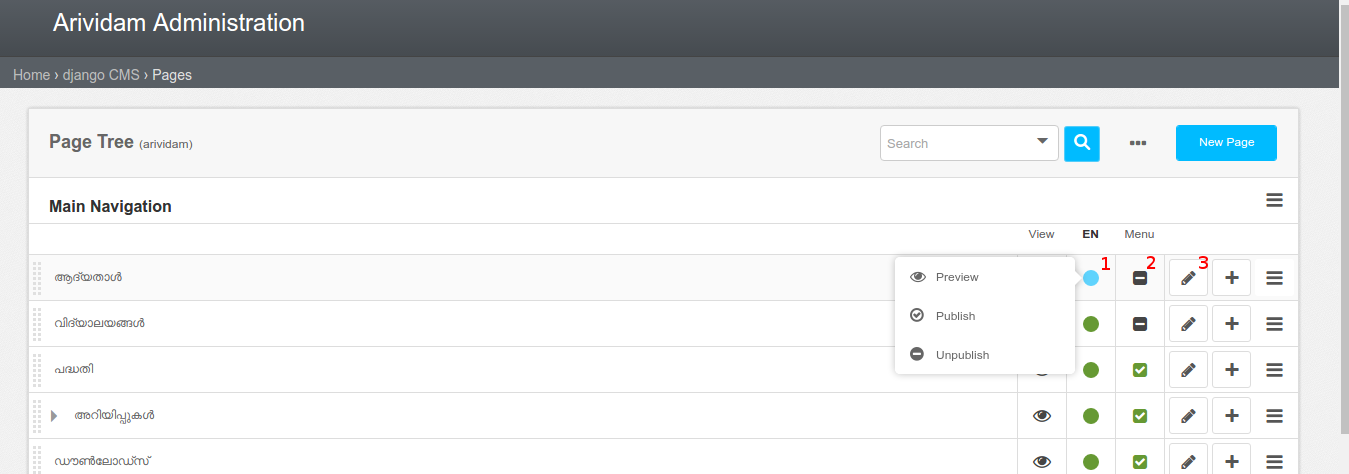
CMS Pages can be administered from the django CMS admin section found here. This link allows you to publish/unpublish pages, choose if a Page should appear in the top menu of the site and change page settings such as its title.

- 1 - Click on this icon to bring up drop-down menu to Preview/Publish/Unpublish changes to the page.
- 2 - Click this icon to show this page in the top menu of the site. A green checkmark indicates that this page will show on the top menu, and a grey bar indicates that it will not. Click to toggle the status.
- 3 - Click this icon to show the page settings dialog. Here you can set the title, menu title, page title and page meta tags.
Visit this page to create a new user. Provide a username and password and click 'Save'. Fill in the personal information on the next screen. Then select a group from the list of Available Groups depending on the type for the new user - Editor, Writer or Officer. The Officer group, grants access to the Dashboard features.